To create DIY textured wall art using recycled materials, start by collecting items like newspaper, fabric scraps, cardboard, or bottle caps. Attach these onto a canvas or wooden base, layering and molding them into interesting shapes. Use thick acrylic paint with tools like palette knives or sponges to add depth and highlight textures. Incorporate metallic or matte finishes for different effects. If you keep exploring, you’ll discover how to blend materials and techniques for a stunning, eco-friendly piece.
Key Takeaways
- Collect recycled materials like newspapers, fabric scraps, cardboard, or bottle caps to create diverse textures.
- Attach materials to a sturdy base such as canvas or wooden board using glue or adhesive.
- Layer and mold materials to build tactile surfaces, combining rigid and soft elements for visual interest.
- Apply thick acrylic or latex paint with tools like palette knives or sponges to enhance texture and add color.
- Finish with metallic or matte paints, dry brushing, or stippling to highlight textures and achieve your desired style.
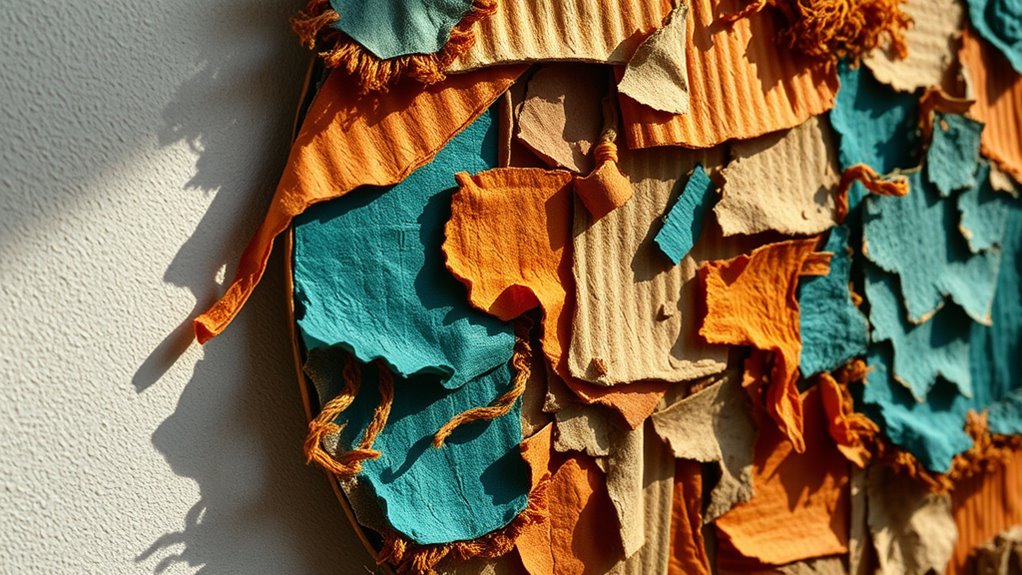
Creating textured wall art is an excellent way to add depth and personality to your space without breaking the bank. When you choose to craft your own piece, you gain the freedom to experiment with various paint techniques and material choices that reflect your style. The beauty of DIY projects lies in their versatility, and textured wall art is no exception. By selecting recycled materials, you not only create something unique but also contribute to sustainability, making your decor both eco-friendly and visually striking.
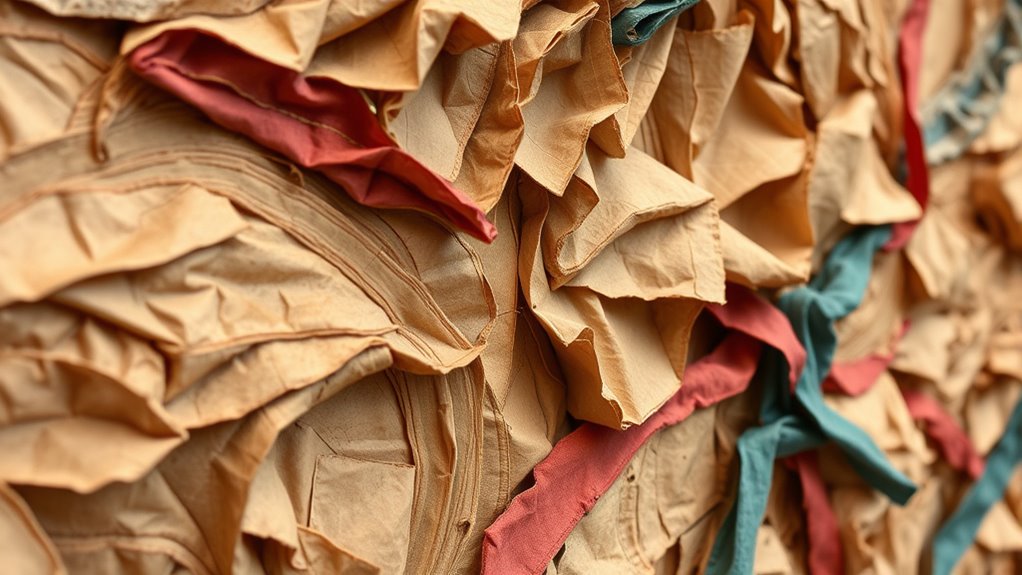
Start by gathering your recycled materials—think old newspapers, fabric scraps, cardboard, bottle caps, or broken jewelry. These items provide a rich base for creating texture and can be glued, layered, or molded onto a canvas or wooden board. Once you’ve assembled your materials, it’s time to contemplate paint techniques that will enhance the texture. Thick applications of acrylic or latex paint work well, especially when combined with tools like palette knives or sponges. For instance, using a dry brush technique can highlight the raised surfaces, emphasizing the tactile quality of your art. Alternatively, stippling or dabbing with a sponge can add depth and variation to your design.
Material choices are key to achieving the desired visual impact. Rigid materials like cardboard or plastic can be layered to create pronounced textures, while softer fabrics can be stretched or crumpled to add organic forms. Metallic or glossy paints can give your piece a modern, reflective quality, whereas matte finishes lend a subdued, sophisticated look. You might also consider mixing different paint techniques—for example, applying a textured base with modeling paste and then adding metallic accents with a dry brush. This approach creates layers of interest that invite viewers to explore the artwork closely.
Amazon Product B0DQ378K28
As an affiliate, we earn on qualifying purchases.
Frequently Asked Questions
What Types of Recycled Materials Work Best for Textured Art?
You should try recycled paper and plastic bottle caps for textured art. Recycled paper adds a rough, layered feel, ideal for creating depth and dimension. Plastic bottle caps bring a shiny, bumpy texture that catches light and adds visual interest. Both materials are versatile, easy to work with, and eco-friendly, making them perfect choices for adding texture and character to your recycled wall art project.
How Long Does It Take to Complete a Wall Art Piece?
Think of creating your textured wall art as planting a garden; it takes time to nurture each detail. Typically, expect it to take 4 to 8 hours, depending on the complexity and your project planning. Timing considerations include drying times and assembly, so plan accordingly. By breaking the project into manageable steps, you’ll enjoy the process and achieve beautiful, recycled masterpieces without feeling rushed.
Can This Method Be Adapted for Outdoor Wall Decoration?
Yes, you can adapt this method for outdoor wall decoration. Focus on weather resistance and material durability by choosing sturdy, waterproof recycled materials like metal, treated wood, or plastic. Seal the artwork with outdoor-grade sealants to safeguard against moisture and UV rays. Properly anchoring your textured art ensures it withstands wind and weather. This way, your outdoor wall art remains vibrant and intact for years to come.
What Safety Precautions Should I Take When Working With Adhesives?
When working with adhesives, you should prioritize safety by wearing safety goggles to protect your eyes from splashes and ventilation masks to avoid inhaling fumes. Work in a well-ventilated area to reduce inhalation risks and follow the manufacturer’s instructions for proper use. Keep adhesives away from children and pets, and wash your hands thoroughly after completing your project to guarantee safety.
How Do I Preserve and Clean Finished Textured Wall Art?
Did you know that textured wall art can last up to 10 years with proper care? To preserve your piece, apply a protective coating like a clear sealant to shield it from dust and moisture. Regular dust removal with a soft brush or cloth keeps it looking fresh. When cleaning, avoid harsh chemicals and gently wipe the surface to prevent damaging the textures, ensuring your artwork remains vibrant and intact for years.
Amazon Product B0BR9V9FKP
As an affiliate, we earn on qualifying purchases.
Conclusion
Now that you’ve crafted your textured wall art from recycled materials, your space transforms into a canvas of creativity and sustainability. Like Van Gogh’s bold strokes, your unique piece adds depth and character to your home. Every scrap and twist echoes your eco-conscious spirit, turning ordinary items into extraordinary art. As you hang your masterpiece, remember: in the art of giving new life, you’ve painted a brighter, greener future for all.
Amazon Product B0DG27JTRS
As an affiliate, we earn on qualifying purchases.