
To create a camera obscura, you’ll need a dark box or room with a tiny pinhole cut in one side, ideally in a well-darkened environment. Inside, set up a light-colored surface to project the outside scene through the pinhole. When you look through the hole, you’ll see an inverted image of the outside environment. Experimenting with pinhole size and setup can teach you how early photographers captured images—if you keep exploring, you’ll uncover more fascinating details.
Key Takeaways
- Construct a dark enclosure with a tiny pinhole to project external scenes onto an interior surface.
- Use a light-tight box and a small needle or pin to create a precise aperture for clear images.
- Inside the box, place a white or light-colored surface to serve as the projection screen.
- Adjust the pinhole size to balance image sharpness and brightness; smaller holes yield sharper images.
- Experiment with different enclosure sizes, pinhole angles, and add lenses to enhance image clarity and understanding of light.
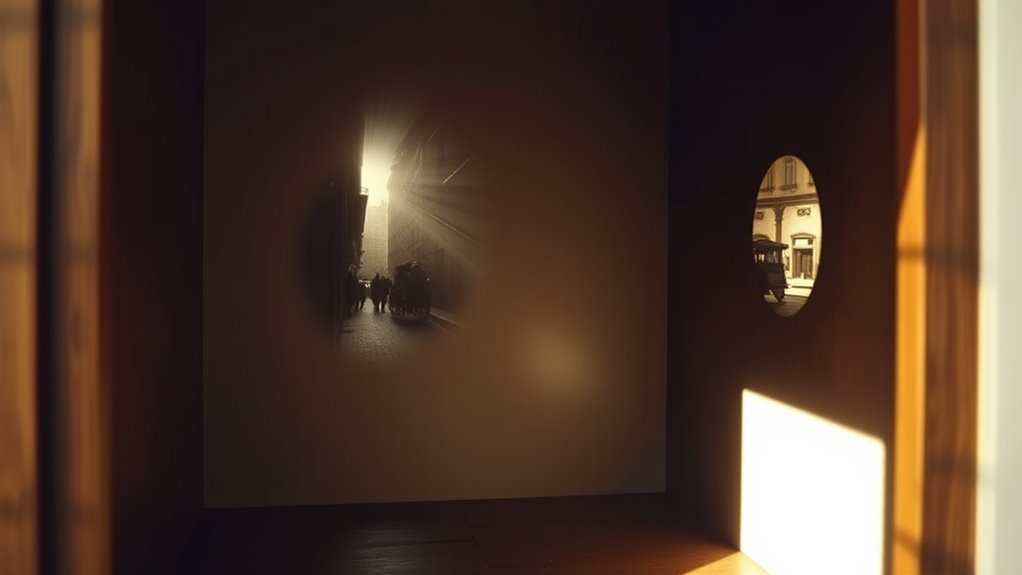
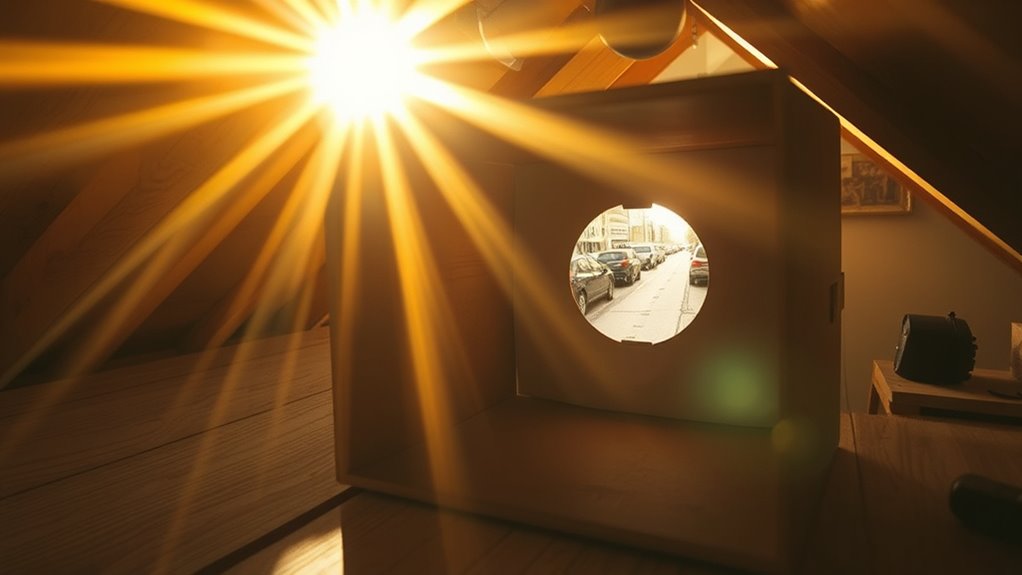
A camera obscura is a simple yet fascinating device that projects an external scene onto a surface inside a dark enclosure. At its core, it operates on the pinhole principles, which means that a tiny hole allows light from outside to pass through and create an image inside. This concept is one of the earliest forms of light projection techniques, demonstrating how light can be manipulated to produce a visual representation of the world. When you set up a dark box or room with a small pinhole on one side, you’ll notice that an inverted image of the outside scene appears on the opposite wall. This process happens because light rays travel in straight lines, crossing through the small aperture and projecting onto the interior surface.
A camera obscura projects inverted outdoor scenes onto a surface through a tiny pinhole inside a dark enclosure.
Understanding the pinhole principles is essential if you want to create your own camera obscura. The size of the pinhole affects the clarity and brightness of the image; a smaller hole produces a sharper but dimmer picture, while a larger hole creates a brighter but less detailed projection. You can experiment with different sizes to find the perfect balance for your setup. The effectiveness of the light projection techniques used in a camera obscura relies on eliminating external light sources, so you’ll want to guarantee the enclosure is well-darkened. Once the environment is dark enough, the scene outside becomes visible inside, as long as the pinhole remains unobstructed. Additionally, the use of light manipulation techniques in a camera obscura highlights the fundamental principles behind modern photography.
To build your own, start with a light-tight box or room. Cut a tiny hole in one side—using a sewing needle or pin works well for precision. On the opposite wall or surface inside the box, attach a white or light-colored sheet where the projected image will appear. When you position yourself outside and look into the box through the pinhole, you’ll see the outside scene projected upside down inside. Adjusting the angle and the size of the pinhole can help improve image sharpness and brightness. For better results, you might experiment with different enclosure sizes or add a lens for enhanced clarity, but even a simple pinhole setup offers a compelling glimpse into the origins of photography and light manipulation techniques.
Creating a camera obscura isn’t just about building a device; it’s about understanding the fundamental principles of light and image formation. By exploring pinhole principles and light projection techniques firsthand, you gain insight into how early artists and scientists captured and studied images long before modern cameras existed. This hands-on experience reveals how simple tools can unlock complex visual phenomena and deepen your appreciation for the roots of photographic technology.

Pinhole Camera Obscura Kit, STEM Educational Kit for Kids
STEM Learning Tool: Hands-on educational kit that teaches children the fundamental principles of light, optics, and photography through…
As an affiliate, we earn on qualifying purchases.
As an affiliate, we earn on qualifying purchases.
Frequently Asked Questions
Can a Camera Obscura Be Used for Modern Photography?
Yes, a camera obscura can be used for modern photography. It’s a fascinating tool that connects historical applications with artistic techniques, allowing you to explore light and perspective in unique ways. By experimenting with a camera obscura, you can create stunning, vintage-style images, deepen your understanding of photographic fundamentals, and appreciate the origins of modern photography techniques. It’s a creative bridge between past and present.
What Materials Are Best for Building a Durable Camera Obscura?
Think of your camera obscura as a fortress for your creativity. For durability factors, opt for sturdy materials like hardwood or metal for the frame, and use thick, opaque materials such as blackened tin or heavy cardboard for the box. These choices guarantee your device withstands time’s test, resisting wear and tear. Proper material selection makes certain your camera obscura remains a steadfast vessel for exploring the roots of photography.
How Does Lighting Affect the Image Quality in a Camera Obscura?
Lighting crucially influences your camera obscura’s image quality by affecting light intensity and shadow contrast. When there’s ample light, your images become brighter with clearer details, but too much can cause glare. Conversely, lower light reduces brightness and sharpness, making shadows softer. Ideal lighting enhances shadow contrast, helping your projected image appear more distinct. Adjusting light levels guarantees you get the best balance for sharp, vivid images through your camera obscura.
Is a Camera Obscura Suitable for Outdoor or Portable Use?
A camera obscura is suitable for outdoor or portable use if you set up a portable system with weather resistance. You can easily carry it to different locations, making it ideal for outdoor photography adventures. Make certain your setup is protected from rain and wind, using weather-resistant materials. With the right portable setup, you can enjoy capturing images outside while keeping your camera obscura safe and functional in various weather conditions.
How Does the Size of the Camera Obscura Influence Image Clarity?
Like looking through a keyhole into a world of clarity, the size of your camera obscura affects image sharpness. A larger box allows for more precise control of lens sharpness and aperture size, resulting in clearer images. Smaller versions might sacrifice detail, producing softer projections. So, if you want sharper images, opt for a larger size, enabling better focus and ideal control over your lens and aperture settings.
TTETTZ Kids DIY Assembly Camera Obscura Science Kit Physics Model for Beginners Compact Design 12×8.3×7.6cm Accessories Wooden
【Easy Assembly for Young Learners】: Designed with intuitive components and clear construction logic, this accessible STEM educational toy…
As an affiliate, we earn on qualifying purchases.
As an affiliate, we earn on qualifying purchases.
Conclusion
Now that you’ve experienced building a camera obscura, you’ve glimpsed the magic behind photography’s birth. It’s more than just a contraption; it’s a bridge to the past, reminding us how curiosity sparks innovation. As you step away, remember that every photograph, every moment captured, is rooted in this simple yet profound discovery. Embrace the wonder, for in these shadows lies the future of seeing the world anew—an eternal dance of light and imagination.

PULUZ Light Box Photography, 12"x12" Professional Dimmable Shooting Tent Kit with CRI >95 White Lighting 120 LEDs Lights + 6 Photo Backdrops for Product Display
【High Brightness】Portable photography studio is built-in 120pcs high-quality LED light beads, provides enough brightness for shooting.
As an affiliate, we earn on qualifying purchases.
As an affiliate, we earn on qualifying purchases.

Dahszhi 16mm 5MP Fixed Board Lens, 5MP HD CCTV Security Camera Wide Angle Lens,Standard M12 Screw Connector Camera Replacement Parts
Package Includes:1x fixed focus lens
As an affiliate, we earn on qualifying purchases.
As an affiliate, we earn on qualifying purchases.