To build a solar oven from cardboard and aluminum, start by cutting a flap in the cardboard to serve as a reflective reflector. Line the interior with smooth aluminum foil to reflect sunlight efficiently. Prop the reflector at an angle toward the sun, and place your cooking container inside the box. Cover the opening with clear plastic or glass to trap heat. To maximize efficiency and learn more tips, keep exploring how to optimize your design.
Key Takeaways
- Construct a sturdy cardboard box with a reflective aluminum foil lining on the interior for efficient heat absorption.
- Cut and angle a cardboard flap to serve as a sun reflector, lining it with aluminum foil for maximum sunlight reflection.
- Use a transparent cover over the opening to create a greenhouse effect, trapping heat inside the oven.
- Position and adjust the reflector angle throughout the day to maximize sunlight entry and oven temperature.
- Place the cooking container inside the box, close securely, and cook food using solar energy sustainably.
Building a solar oven is an easy and eco-friendly way to harness the power of the sun for cooking. When you create your own solar oven from simple materials like cardboard and aluminum, you’re tapping into solar energy, a clean and renewable technology that reduces reliance on traditional fuels. This project not only saves you money but also helps lower your carbon footprint, making it a practical choice for environmentally conscious individuals.
Building a solar oven with simple materials promotes eco-friendly cooking and reduces your carbon footprint.
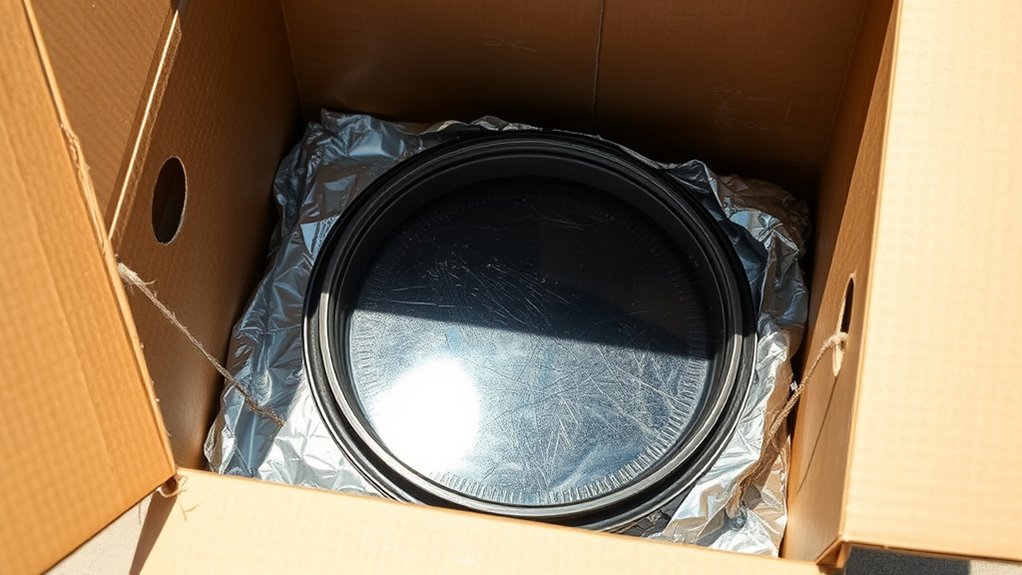
The core idea behind building a solar oven with cardboard and aluminum is to maximize the sun’s radiant energy and convert it into heat for cooking. Cardboard acts as an insulator, trapping heat inside, while aluminum reflects sunlight directly onto your cooking area. You’ll want to select a sturdy piece of cardboard that’s large enough to hold your cooking pot or container. Cut a flap into the cardboard to serve as a reflector, and line the interior with aluminum foil, ensuring it’s smooth and reflective. This foil captures and directs sunlight efficiently, increasing the heat inside the oven.
Positioning the reflective flap is essential. You should angle it towards the sun to reflect maximum sunlight into the oven chamber. You can use a stick or a piece of cardboard to prop the flap at the right angle. As the sun moves throughout the day, adjusting this angle will help maintain ideal sunlight reflection. The reflective surface amplifies the solar energy entering the oven, boosting its temperature and cooking speed. Remember, the more sunlight you direct into the oven, the hotter it will get, so positioning is key.
Once assembled, place your cooking container inside the cardboard box, close it, and make sure the lid or flap stays in the correct position. To improve heat retention, you can cover the opening with clear plastic or glass, creating a mini greenhouse effect that traps heat inside. This setup allows you to cook foods like vegetables, rice, or even bake bread using only the sun’s renewable energy. It’s an engaging way to learn about solar power, demonstrating how renewable technology can be harnessed for everyday tasks. Incorporating solar energy principles enhances your understanding of sustainable practices and renewable resources.
Amazon Product B09T177DQ9
As an affiliate, we earn on qualifying purchases.
Frequently Asked Questions
How Long Does It Take to Cook Food in a Solar Oven?
In a solar oven, your cooking time varies based on solar oven efficiency and weather conditions, but typically, it takes about 1 to 2 hours to cook meals like vegetables or rice. Factors such as sunlight intensity, food size, and type also influence cooking time. To speed things up, guarantee your oven is well-insulated and positioned to maximize sunlight exposure, helping you prepare food safely and effectively.
Can a Solar Oven Be Used During Cloudy Days?
A solar oven can still be used during cloudy days, but cloud cover reduces oven efficiency considerably. You might find that cooking takes longer or isn’t as effective because less sunlight reaches the reflective surfaces. To maximize heat, position your oven in the clearest, sunniest spot available and keep the cover well-insulated. Remember, cloudy conditions mean slower cooking times, so patience is key when using your solar oven on overcast days.
What Types of Food Are Best Suited for Solar Cooking?
You’ll find fruit desserts, hearty stews, and baked grains are best suited for solar cooking. These foods benefit from slow, even heat, allowing flavors to meld and textures to develop fully. You can gently simmer stews, soften vegetables, and caramelize fruits, all while conserving energy. Embrace the natural rhythm of solar cooking, where patience enhances taste, and simple ingredients shine through the gentle, consistent heat of your solar oven.
How Do I Prevent Heat Loss From the Oven?
To prevent heat loss, you should focus on insulation techniques and using reflective surfaces. Wrap your oven with insulating materials like foam or thick cardboard to retain heat, and line the interior with reflective surfaces such as aluminum foil to bounce sunlight back inside. Keep the lid tightly sealed, and minimize opening it frequently to maintain the temperature. These steps will help your solar oven cook efficiently and retain maximum heat.
Is It Safe to Leave a Solar Oven Unattended?
It’s not safe to leave a solar oven unattended, as solar oven safety is important to prevent accidents. While solar ovens are generally safe, unattended cooking can pose risks like overheating or fire if the sun’s intensity changes unexpectedly. Always monitor your solar oven while in use, and avoid leaving it unattended for extended periods. Keeping an eye on your cooking guarantees safety and better results.
Amazon Product B07VWFGRDX
As an affiliate, we earn on qualifying purchases.
Conclusion
As you stand by your homemade solar oven, it’s amazing how a simple cardboard and aluminum setup can harness the sun’s power. Sometimes, the best inventions come from coincidence—like discovering that aluminum foil reflects more heat than you expected. That moment of realization makes you appreciate how small, unexpected details can turn a basic project into something truly effective. Ultimately, your creation shows that with a little ingenuity, you can turn everyday materials into a sustainable solution.

Isner Mile Beard Grooming Kit for Men Care: with Beard Oil Balm Wash Brush Comb & Straight Razor, Birthday Valentines Fathers Gifts for Men Him Boyfriend Husband Coworker, Christmas Stocking Stuffers
COMMAND ATTENTION WHEREVER YOU GO - A groomed beard will make you stand out from the crowd! The...
As an affiliate, we earn on qualifying purchases.
Amazon Product B0B84DJXSW
As an affiliate, we earn on qualifying purchases.