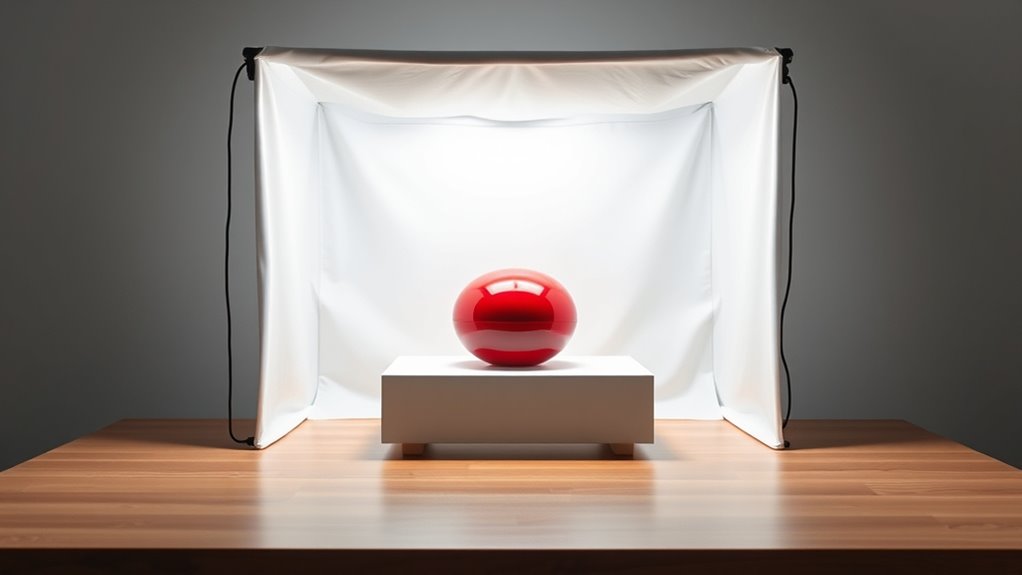

To build your own lightbox for product photography, start with a sturdy, lightweight frame using materials like foam board or poster board, and create seamless backgrounds in neutral colors. Diffuse light evenly by adding materials like white fabric or parchment paper, placed strategically around your light sources. Position lights at different angles, such as 45°, to reduce shadows and highlight details. Proper setup guarantees professional, appealing images—keep going to discover step-by-step instructions and useful tips.
Key Takeaways
- Use durable, lightweight materials like foam boards or poster boards to construct the frame and interior surfaces.
- Incorporate translucent diffusing materials such as parchment paper or fabric to soften and evenly distribute light.
- Set up a lightbox with multiple light sources at 45° angles to ensure balanced, natural-looking illumination.
- Choose neutral, seamless backgrounds like white or light gray to highlight products without distractions.
- Ensure the lightbox size is appropriate for your products, allowing for flexible lighting setups and better diffusion.
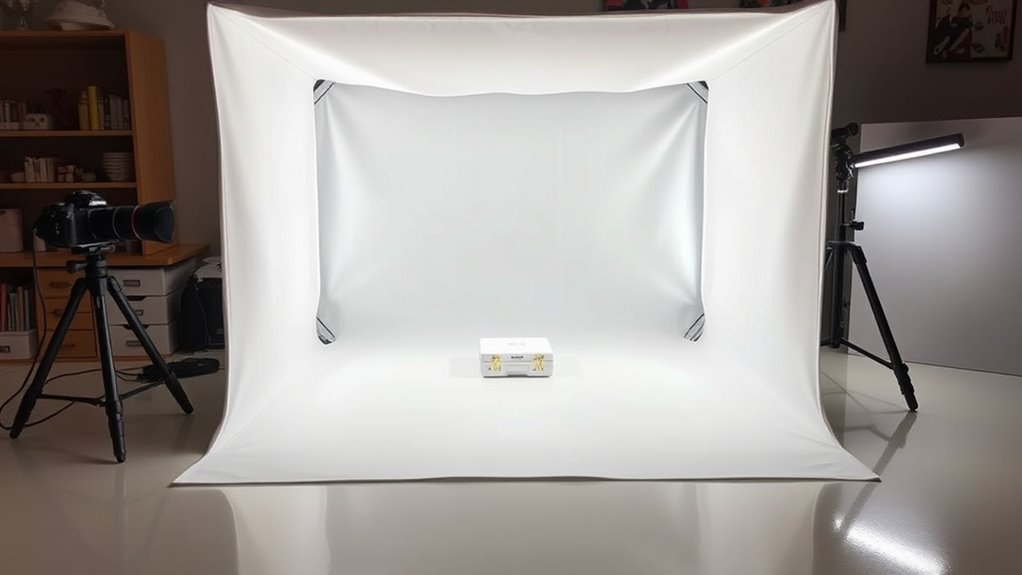
Creating your own lightbox is an affordable and effective way to improve your product photography. When you start building it, one of the most important aspects to consider is lighting techniques. Proper lighting can make your products look professional and appealing, so you want to set up your lightbox to diffuse light evenly and eliminate harsh shadows. Using softboxes, diffusers, or even white fabric can help spread light uniformly across your product. Experiment with positioning your light sources at different angles—placing lights at 45 degrees on either side and above your product often yields the best results. This setup minimizes unwanted reflections and highlights your product’s best features. Remember, the goal is to create a balanced, natural-looking light that showcases your product’s details without overpowering or dulling them. Additionally, understanding lighting techniques is crucial to achieving a professional look in your photos.
Material selection plays a critical role in the effectiveness of your DIY lightbox. For the interior surfaces, choose materials that reflect light evenly, such as white foam board, poster board, or matte white fabric. These materials bounce light softly across your product, reducing shadows and creating a clean, professional look. Avoid shiny or reflective surfaces inside the box, as they can cause unwanted glare and uneven lighting. The material for the background should be seamless and neutral—white or light gray works well—to keep the focus on your product without distracting colors or patterns. For the sides, consider using translucent materials like parchment paper or thin fabric to diffuse the light further. This helps eliminate hotspots and harsh shadows, giving your photos a polished appearance.
When selecting materials, think about durability and ease of assembly. Lightweight foam boards are affordable and easy to cut to size, while fabric can be draped or taped into place. Ensure that everything is securely fastened to avoid shifting or creating uneven surfaces that could affect your lighting setup. The quality of your material choices influences how well your lightbox performs, so investing in the right materials upfront saves you time and frustration later. Also, consider the size of your lightbox—larger boxes allow for bigger products and more flexible lighting arrangements, but they require sturdy materials to maintain their shape.
Frequently Asked Questions
What Materials Are Best for DIY Lightbox Walls?
For DIY lightbox walls, you should select lightweight, reflective materials like white foam board or acrylic sheets, which improve light diffusion and minimize shadows. Cardboard with white paper lining functions well for easy wall construction, providing a smooth, even surface. You can also use translucent plastic or fabric for softer light diffusion. These material choices guarantee your lightbox produces professional-quality product photos with consistent, even lighting.
How Do I Achieve Consistent Lighting Inside the Lightbox?
To achieve consistent lighting inside your lightbox, use diffused lighting sources like softboxes or LED panels with diffusers. Position the lights evenly around your setup to prevent harsh shadows and guarantee uniform illumination. Keep the light temperature constant to maintain color consistency across your photos. Adjust the brightness as needed, and avoid direct, unfiltered light, so your product’s colors stay true and consistent in every shot.
Can I Use Natural Light Instead of Artificial Lighting?
Think of natural light as sunlight streaming through a window—bright, soft, and dynamic—making it tempting to use instead of artificial lighting. You can definitely rely on natural lighting, but it’s less predictable and harder to control inside your lightbox. While natural light offers a gentle, authentic glow, artificial lighting provides consistency and precision. Use natural light when conditions are steady, but keep artificial lighting as your backup for perfect, repeatable results.
What Size Should My Lightbox Be for Different Products?
You should choose lightbox dimensions based on your product size considerations. For small items like jewelry or accessories, opt for a compact box around 12×12 inches. Medium products, such as cosmetics or gadgets, require a 20×20 inch box. Larger items like shoes or home decor need a bigger lightbox, roughly 24×24 inches or more. Always make certain there’s enough space for proper lighting and to avoid cluttered images.
How Do I Prevent Reflections and Glare on Shiny Objects?
To prevent reflections and glare on shiny objects, you should use polarized filters to cut down on unwanted reflections and glare. Additionally, employing diffusing fabrics inside your lightbox softens the light, reducing harsh reflections. Position your lights at angles that minimize direct reflections, and experiment with different diffusers to find the best setup. This approach guarantees your product looks professional and well-lit without distracting glare.
Conclusion
Now, with your custom lightbox ready, imagine the stunning shots you’ll capture—every detail perfectly illuminated, shadows minimized. But the real magic begins as you experiment with different angles, backgrounds, and lighting tweaks. Will your next product photo stand out even more? The possibilities are endless, and your journey has just begun. Get ready to reveal new levels of creativity and turn your simple setup into a powerhouse of professional-quality images. The best shots are still ahead.